
Controlling AC Light Using Arduino With Relay Module 7 Steps Instructables
Toggle relays remotely using Command + Control in Meadow Cloud Sending and receiving data from our devices is a common use case, but it's also… Liked by Olivier Bloch
ARDUINO
That's all on Arduino Relay Tutorial: Control High Voltage Devices with Relay Modules! Now that you know what is the relay and how it works, possibilities are endless as you can control many high voltage devices using various devices like the TV remote, Bluetooth, internet, etc with the Arduino. We hope you've found this guide useful.

Controlling a 230V AC Bulb Using Arduino Uno and Relay YouTube
You can use a 5V relay to switch the 120-240V current and use the Arduino to control the relay.. Remember, power = current * voltage so a 30A@220V relay can handle up to a 6,000W device. * If you just replace the LED with any other electrical device like fan, bulb, fridge etc., you should be able to turn that appliance into a smart device.
1PC 1 Channel Relay Module Board 5V DC AC for Arduino ARM DSP PIC AVR Electronic Can Control
It's an electromechanical device that can be electrically controlled to control high voltage and currents. Here is my Channel on Youtube: AeroArduino Supplies 12V - 220V/16A Relay Diode 10K Ohm Resistor 2N2222 NPN Transistor Arduino UNO Wires Soldering Iron Soldering Wire Breadboard 1mm Copper Wire

How to control 220v bulb with android using arduino and relay YouTube
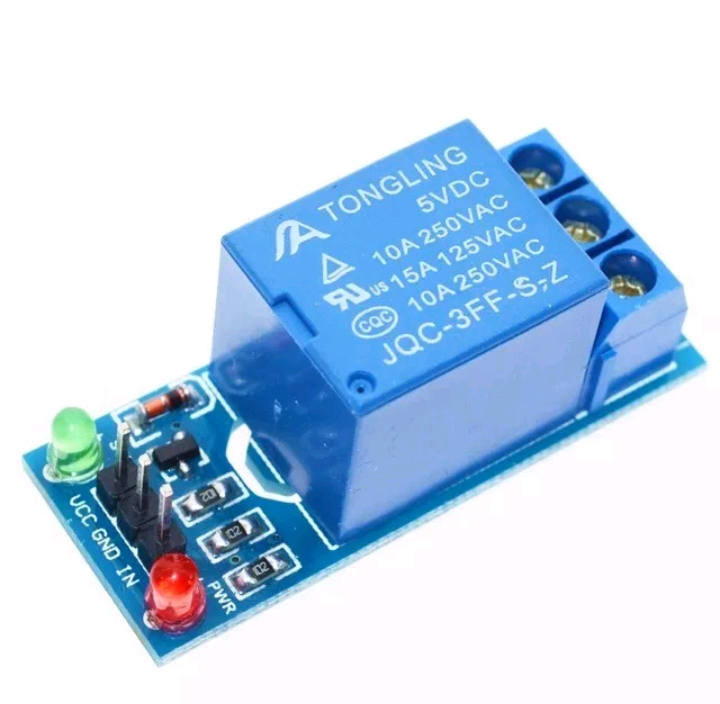
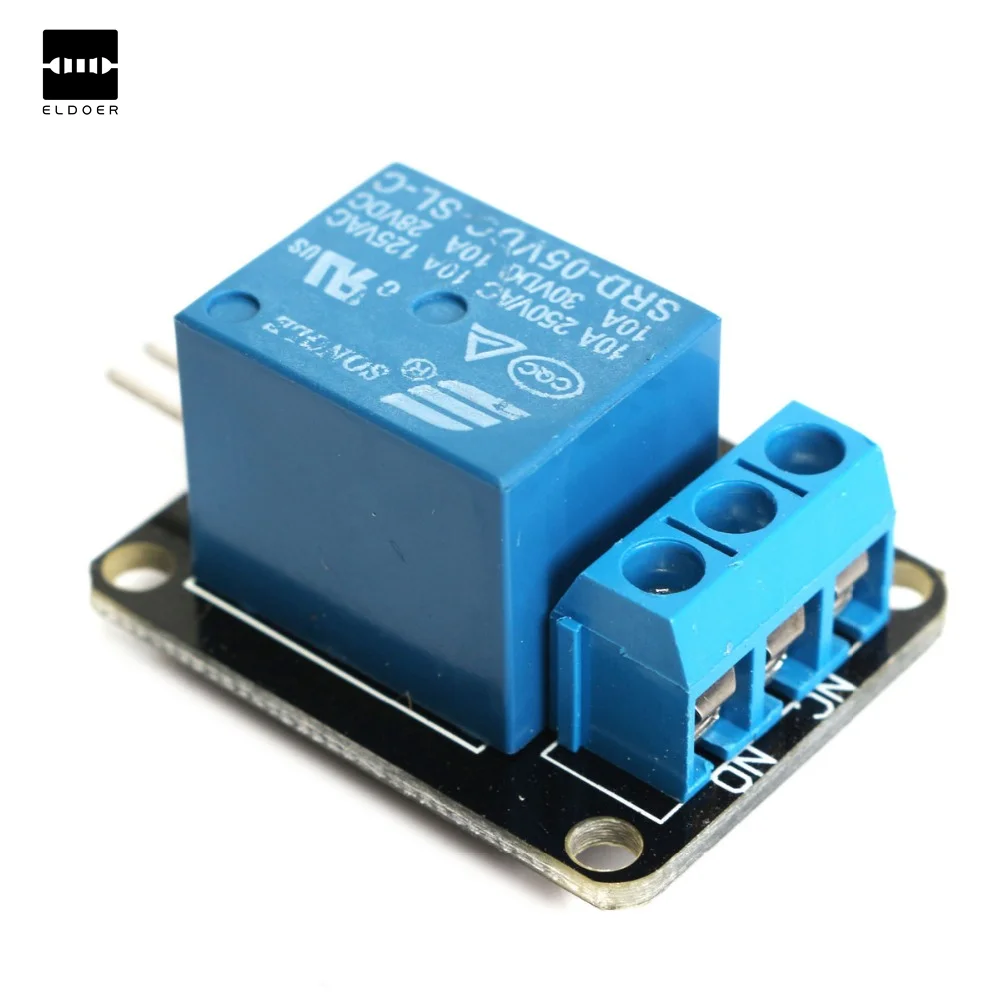
Where VCC is the arduino's 5 volts, the GND is the arduino ground. The in pin is where you will be controlling your relay from. You can connect this to any pin of the arduino, as long as it's an output pin. On the other side of the relay, there are usually three screw terminals.

Gambar Interface Kontrol Lampu Ac 220v Menggunakan Relay Arduino Gambar 1 di Rebanas Rebanas
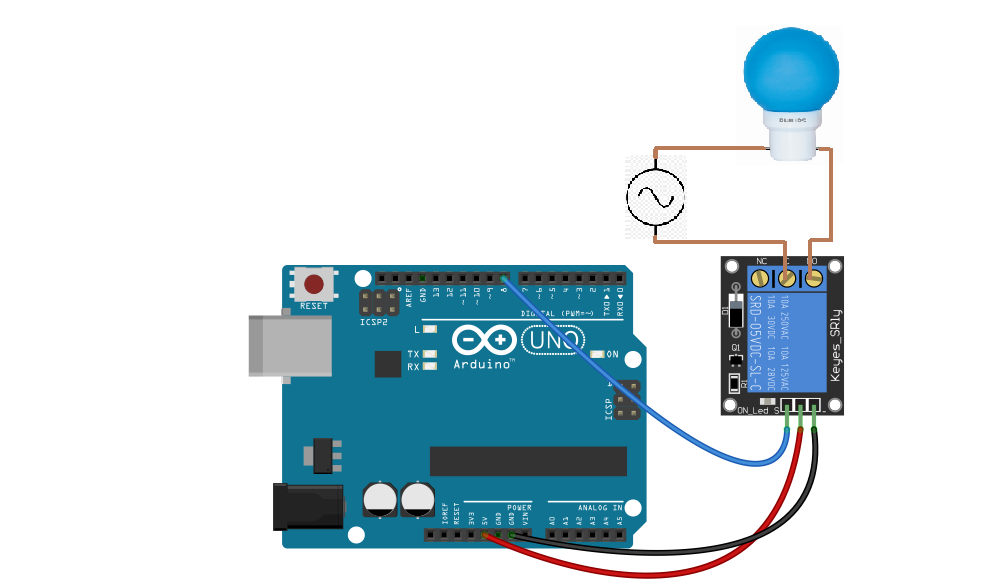
The Arduino's 5V pin will be connected to the Vcc pin of the module and the pin number 7 to the In1 input pin for controlling the relay. Now for the HIGH Voltage part we need a power plug, a socket and a cable with two wires. One of the two wires will be cut and connected to the common and the normally open pin of the module output connector.
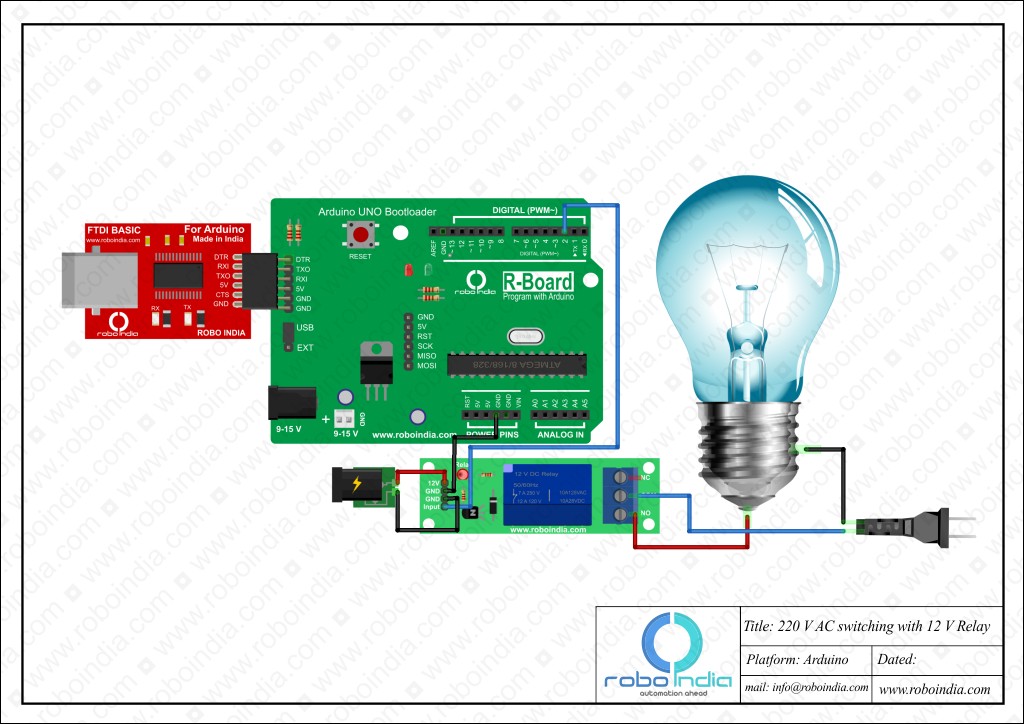
Arduino 220V AC switching by 12V Relay Robo India Tutorials Learn Arduino Robotics
Step 1: Wiring Arduino and the relay board. 1) Take a jumper (Dupont cable) and connect one end to PIN 7 of Arduino. 2) Connect the other end of the jumper to the S PIN on the relay module. The connection will look like the image below. 3) Make a connection between Arduino 5 V pin and the (+) PIN on the relay module.

2pcs 5V Dual Channel 2 Relay Module Arduino Relays Switch 110V 115V 120V 220V US eBay
Power up Arduino and a Relay with 220v Using Arduino General Electronics shonek August 14, 2015, 2:28pm 1 Hi, I have an Arduino Nano working with esp8266 and a relay to turn on/off a lamp, everything works fine but I am using two wall plugs just for one lamp. (one for Arduino, one for the lamp)
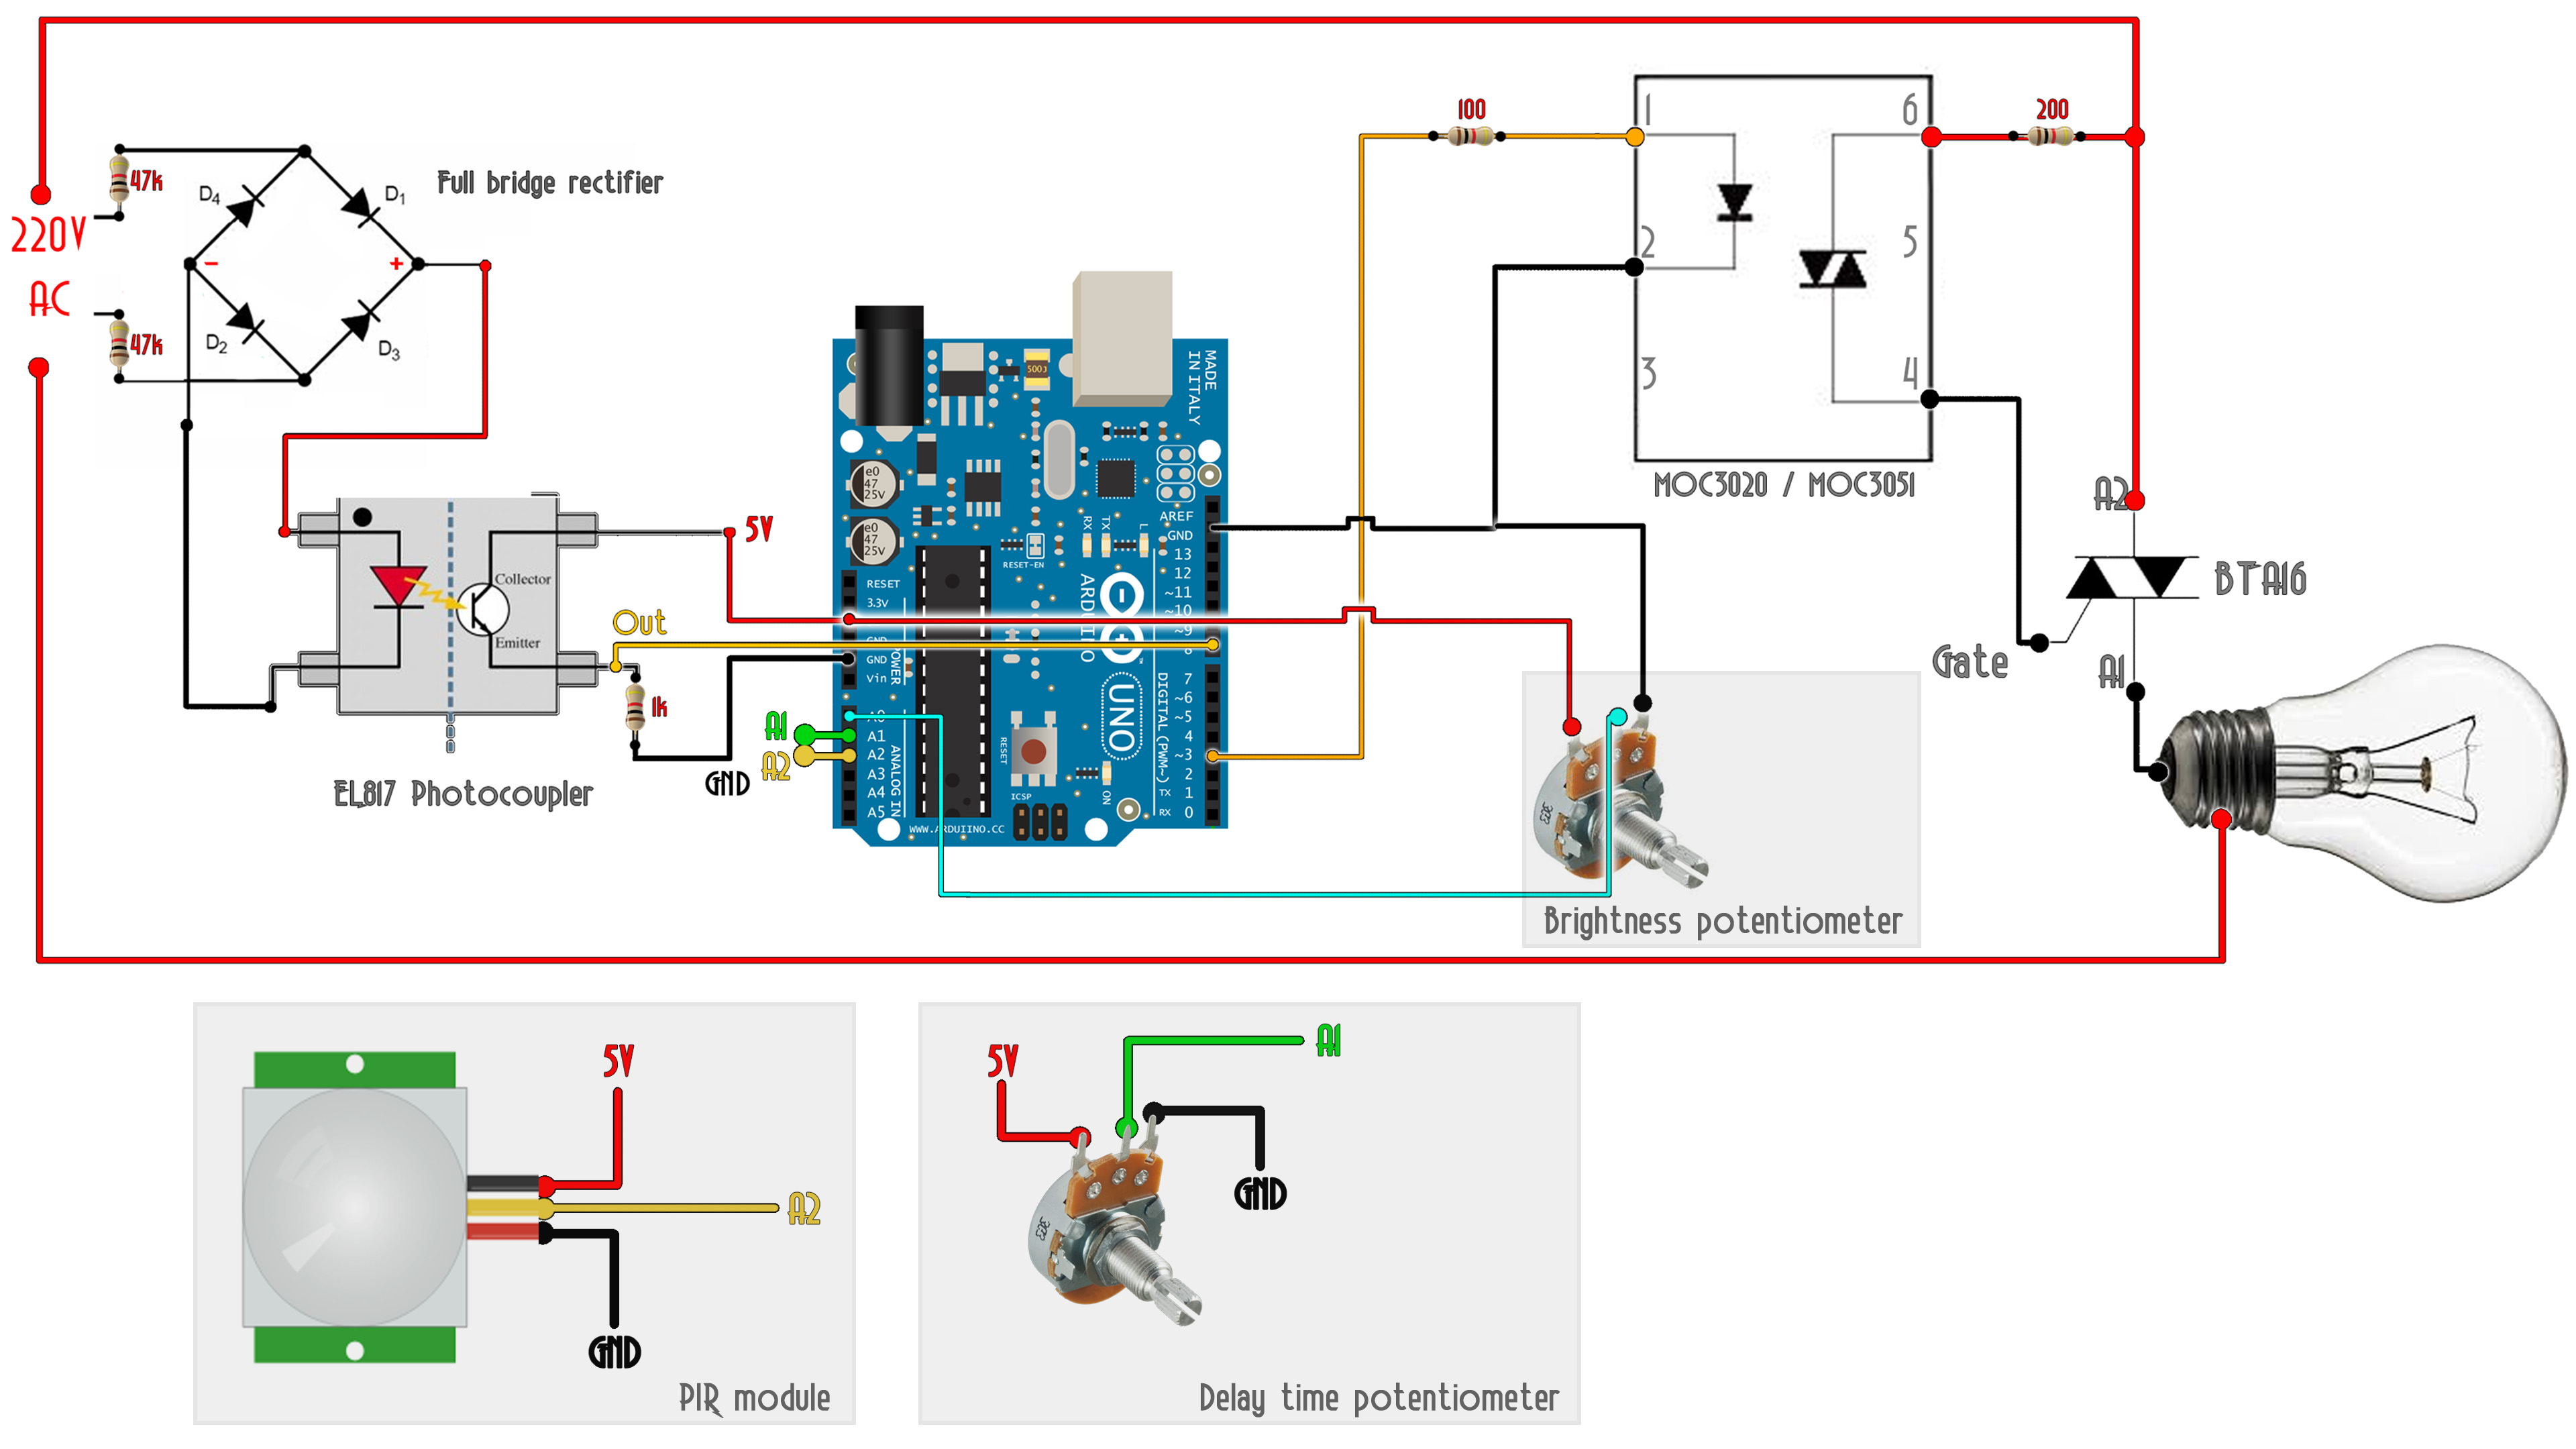
Arduino PIR TRIAC AC 220V light bulb switch
About Relay A relay is a programmable electrical switch, which can be controlled by Arduino or any micro-controller. It is used to programmatically control on/off the devices, which use the high voltage and/or high current. It is a bridge between Arduino and high voltage devices. WARNING

Operating 220V Device by using Arduino UrukTech
Revue des Ingenieurs Supelec 1 mars 2008. Véritable culture d'entreprise, l'innovation est au cœur de la stratégie de développement de DURA Automotive, acteur majeur des systèmes de commande, des pièces de carrosserie et de module de vitre pour les constructeurs automobiles. entretien avec Lionel Bitauld (Supelec 88), Directeur Innovation.

4pcs 5V Dual Channel 2 Relay Module Arduino Relays Switch 110V 115V 120V 220V US eBay
A relay is an electrically operated switch that can be turned on or off, letting the current go through or not, and can be controlled with low voltages, like the 5V provided by the Arduino pins. Controlling a relay module with the Arduino is as simple as controlling any other output as we'll see later on. This relay module has two channels.

Relay Control 220V + Arduino Nano YouTube
In this Arduino Relay Control Circuit we have used Arduino to control the relay via a BC547 transistor. We have connected transistor base to Arduino pin A0 through a 1k resistor. An AC bulb is used for demonstration. The 12v adaptor is used for powering the circuit. Working is simple, we need to make the RELAY Pin (PIN A0) high to make the.

How to use a relay with Arduino Turn on and off 220V AC Motor Motor Lamp YouTube
Controlling a Relay Module With an Arduino Uno and an IR Remote: This instructable is for connecting your Arduino to a 4 Channel relay module and using your sketch to control the switches.. I want to control the relay with ir sensor using ardunio when power supply turn on again not to restart the relay.But my testing is autorestart the relay.
Relay Module interfacing with Arduino Arduino Relay Module Hackster.io
0:00 / 6:34 How to use relay with arduino - Turn on and off 220V AC lamp miliohm 10.3K subscribers Join Subscribe Subscribed 316 26K views 3 years ago This is tutorial video about how to turn.

Operating 220V Device by using Arduino UrukTech
In this quick Arduino tutorial I will explain how you can control a relay using the Arduino Board, one 1K and one 10K resistors, 1 BC547 transistor, one 6V or 12V relay, one 1N4007 diode and a 12V fan. When the button is pressed the fan will turn ON and will remain in this state until the button is pressed again.

How to Use Relay With Arduino Switch on and Off 220VAC Lamp
1. Introduction: This tutorial explains switching 220V AC device with a 12V DC relay. This tutorial also explains how does a relay works. You need to be very careful with 220V AC power supply. We recommend to use proper bulb holder and cord with plug. Don't touch any wire or AC supply. 1.1 Relay: